1. | Click
the ADC Tools link to the left of the Active Directory Connector
Services console. Click Set. This will bring up the Tool Settings
screen, shown in Figure 1.
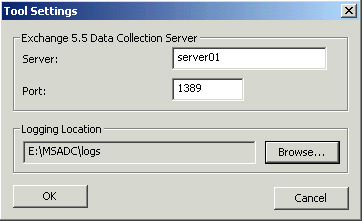
There are a few things to note about this configuration step. First,
the Server field is where you specify your Exchange Server 5.5 server.
Second, the Port field refers to the LDAP port for communicating with
the Exchange Server 5.5 server. The default LDAP port (389) must be
changed if you installed the ADC on a domain controller. This is
because Active Directory uses LDAP, and there will be contention for
the port. Whatever you changed the port to in the previous lesson using
the Exchange Server 5.5 (if you followed my recommendation, the port
should be 1389) Administrator utility will need to be matched here.
Finally, note the Logging Location for the log files. This path
defaults to the My Documents folder of the user that is currently
logged in, but you can change it to any folder.
Tip If
you change the default LDAP port on the Exchange Server 5.5 server, you
must restart the Microsoft Exchange services on the Exchange Server 5.5
server for the changes to take effect. |
|
2. | Click
Run, which causes the wizard to collect information about your Exchange
Server 5.5 site or sites. The Information field in ADC Tools displays
information about the data collection—what was found and what steps
will need to be performed to resolve any problems. The following is an
example of output from this task:
Pass 1 of 4: Resource Mailbox Scan (objects processed: 14)
Warning: The Data Collection tool found objects that must be marked as resource
mailboxes before they can be replicated to Active Directory. Running the Resource
Mailbox Wizard in Step 3 will resolve these issues.
Pass 2 of 4: Active Directory Connector Object Replication Check (objects
processed: 19)
Warning: The Data Collection tool found objects that are not replicated from the

Exchange 5.5 directory to Active Directory. Running the Connection Agreement Wizard
in Step 4 will resolve these issues.
Pass 3 of 4: Active Directory Object Replication Scan (objects processed: 0)
Active Directory Object Replication Scan completed. No unreplicated objects found.
Pass 4 of 4: Active Directory Unmarked Resource Mailbox Scan (objects processed: 0)
Active Directory Unmarked Resource Mailbox Scan completed. No problems found.
The Data Collection tool found objects that must be marked as resource mailboxes
before they can be replicated to Active Directory. Running the Resource Mailbox
Wizard in Step 3 will resolve these issues.
Finished Data Collection.
|
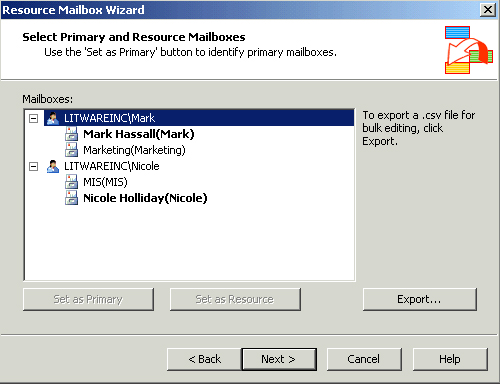
3. | Next
to Step 3, click Run. This will start the Resource Mailbox Wizard. This
wizard helps to resolve any problems with Active Directory user
accounts being mapped to multiple Exchange Server 5.5 mailboxes. As
shown in Figure 2,
you can choose the primary mailbox for each object found by the wizard.
To set a resource, click the mailbox for the user, and then click Set
As Primary (or Set As Resource if you are setting a resource mailbox).
The reason for this is that there is a one-to-one relationship between
Active Directory user accounts and Exchange Server mailboxes—a
relationship that didn’t exist under Windows NT 4 and Exchange Server
5.5. In the latter, it was common to have a resource mailbox, such as a
mailbox called Payroll, associated with a user account. That user
account might also be associated with a personal mailbox. To resolve
this issue, when the wizard finds multiple mailboxes associated with a
user account, you are prompted to define the mailbox as the primary
mailbox for the user account, or as a resource mailbox. If you set it
as a resource mailbox, a new disabled user account is created in Active
Directory and is associated with the mailbox. When finished, click
Next. Alternatively, you can export the list to a .csv file for further
manipulation.
|
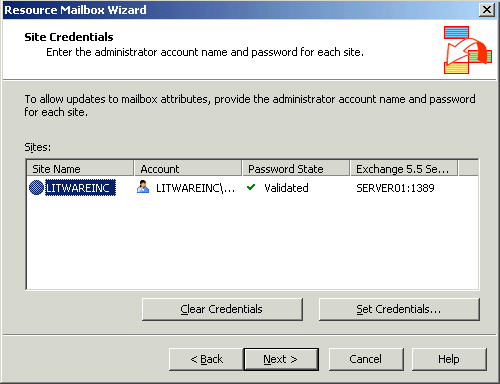
4. | Next, you will set the site credentials. As shown in Figure 3,
supply an administrative account and password for each Exchange Server
5.5 site. Note that if you have changed your default LDAP port, you
will need to choose Specify A Server rather than Automatically Discover
A Server. Click Next to continue.
|
5. | The
last page of the Resource Mailbox Wizard is a summary of actions the
wizard will take. Click Next, and the wizard completes. Click Finish
when it is done to return to the ADC Tools page.
|
6. | Next,
verify the results of the Resource Mailbox Wizard. Click Verify to
complete this step. You will see the wizard perform a verification
step. When finished, you should see text that tells you that
verification completed without a problem. If there are problems, the
text advises you what you need to fix by re-running the Resource
Mailbox Wizard.
|
7. | After
verification completes, click Run in Step 4 to start the Connection
Agreement Wizard. The wizard uses the information collected in Step 1
to recommend connection agreement settings between the Exchange Server
5.5 organization and Active Directory.
|
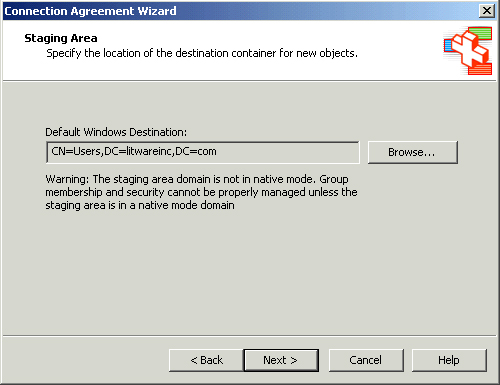
8. | After the Welcome page, the first configuration step is to select a Default Windows Destination, as shown in Figure 4.
This is the container in Active Directory that will be used as the
default location for new objects that are replicated with the Exchange
Server 5.5 directory. Usually the built-in Users container is a good
choice, but depending on your organizational unit (OU) structure, you
may choose another container. Select a container, and then click Next.
|
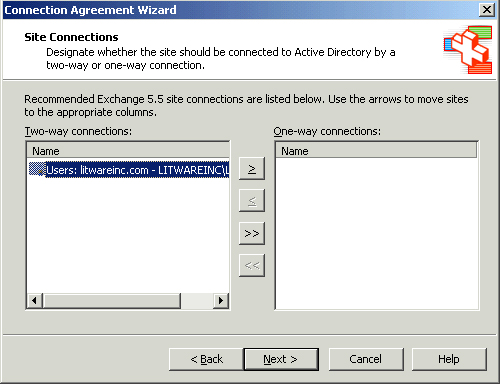
9. | The next page of the wizard is the Site Connections page, shown in Figure 5.
Choose whether to configure a two-way connection agreement between
Active Directory and Exchange Server 5.5 or a one-way connection
agreement. A two-way connection agreement replicates in both
directions, which means that changes made in Active Directory are
replicated to the Exchange directory and vice versa. A one-way
connection agreement can be established in either direction, if
desired. The default is a two-way connection agreement, which you
should accept by clicking Next.
|
10. | On
the Site Credentials page, you must supply an administrative account
and password for each Exchange Server 5.5 site. To do this, click the
first Exchange Server 5.5 site and click Set Credentials. You can
either type in the name of an administrative account or browse for one.
Once you’ve entered an account, click OK to return to the Site
Credentials page. Repeat the process for each Exchange Server 5.5 site,
and then click Next to continue.
|
11. | The
next page of the wizard is the Domain Credentials page. Whereas site
credentials validate your account in the Exchange Server 5.5 directory,
domain credentials validate your account information in Active
Directory. Click Set Credentials and enter the username and password
for an account that has domain administrator permissions. Click OK, and
then click Next to continue.
|
12. | The wizard prompts you to choose what connection agreements to create. As shown in Figure 6,
by default one agreement for users and mailboxes and one agreement for
public folders are created. However, you can choose one or the other,
if desired. After selecting the connection agreements, click Next.

|
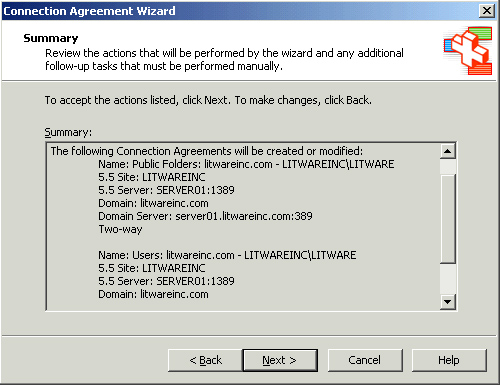
13. | An installation summary similar to the one shown in Figure 7
lists the actions the wizard will perform. When you click Next, the
connection agreements will be configured. When the process finishes,
click Finish to return to the ADC Tools page.
|
14. | Finally,
verify the results of ADC Tools by clicking Verify in Step 4 next to
Verify The Results Of ADC Tools. When verification is complete, the
Information field will display the following:
ADC Tools are complete and Active Directory Connector is successfully configured.
Return to the Deployment Tools to continue your Exchange deployment.
Finished verifying the results of the ADC Tools. |